Alright, here’s my guide for making CO2 SM setups at roundstart without needing Science to research anything or Miners to mine anything for upgraded Thermomachines. I’m gonna show my setups for the maps that have a normal SM (so not Pubby). The main goal is getting the EER as high as possible without hitting 5000+ and potentially getting anomalies to ruin your day.
Pros:
Makes a lot more power than the default SM setups.
Makes Pluoxium as a byproduct.
Doesn’t require anything you won’t have at roundstart.
Will make power with no emitters in case the power’s too low for them to fire.
Cons:
High radiation means that you’ll need radiation protection to hang out in the area.
Vulnerable to the Supermatter Surge random event. (Won’t cause a delamination, but Pyroclastic Anomalies are possible.)
If sabotaged, can lead to a Telsa delamination.
First things first, boot up your tablet and download the Smmonitor and Alarm Monitor apps. Then you can leave your tablet in your pocket to be able to see it and interact with it as needed. Then you’ll need to do a little bit in Atmos. (If you don’t have access, either get access or have your Atmos tech do it for you.)
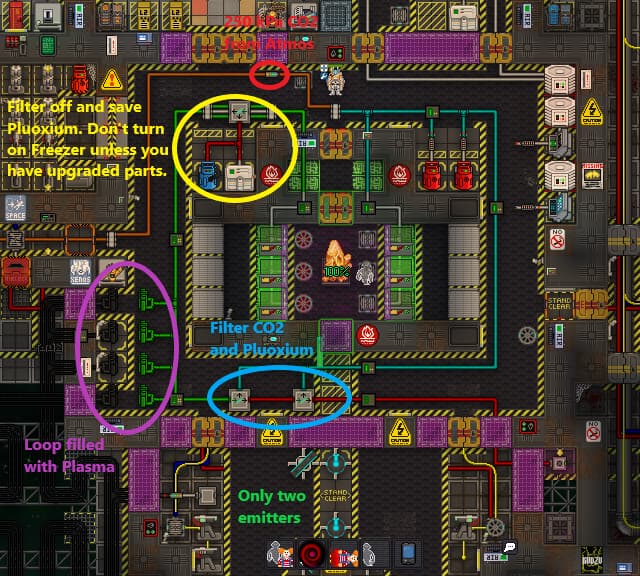
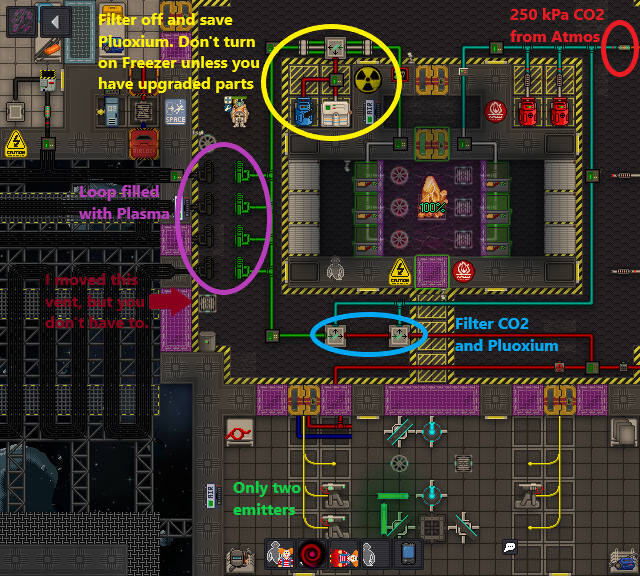
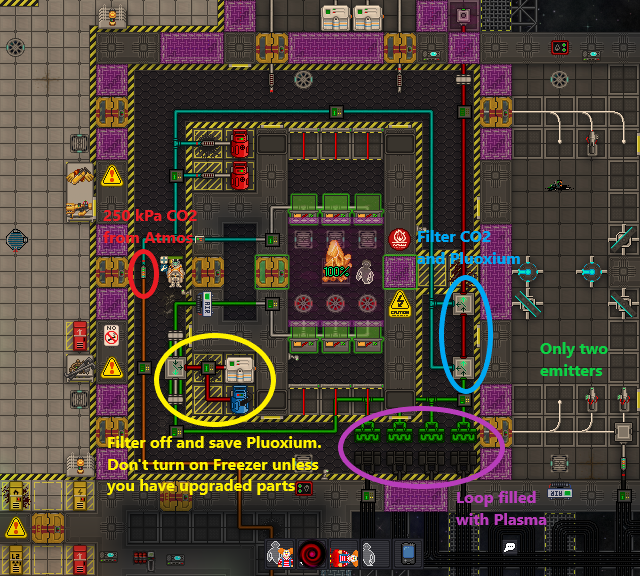
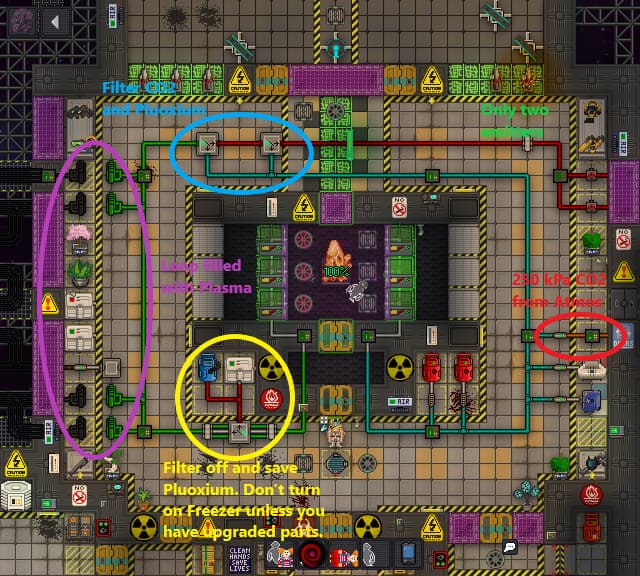
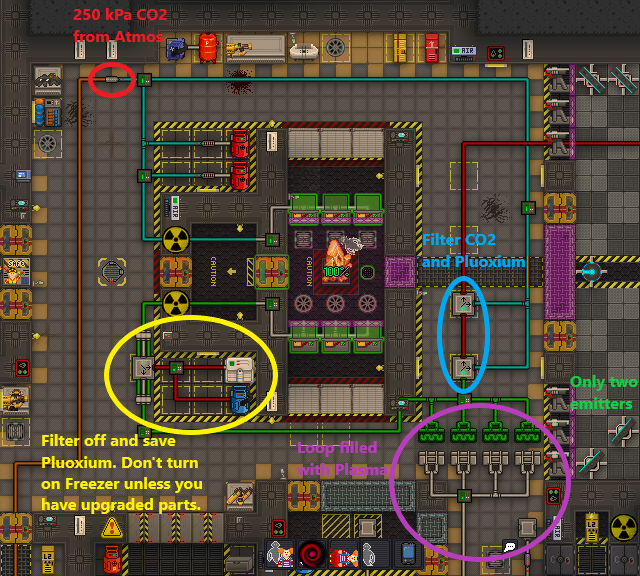
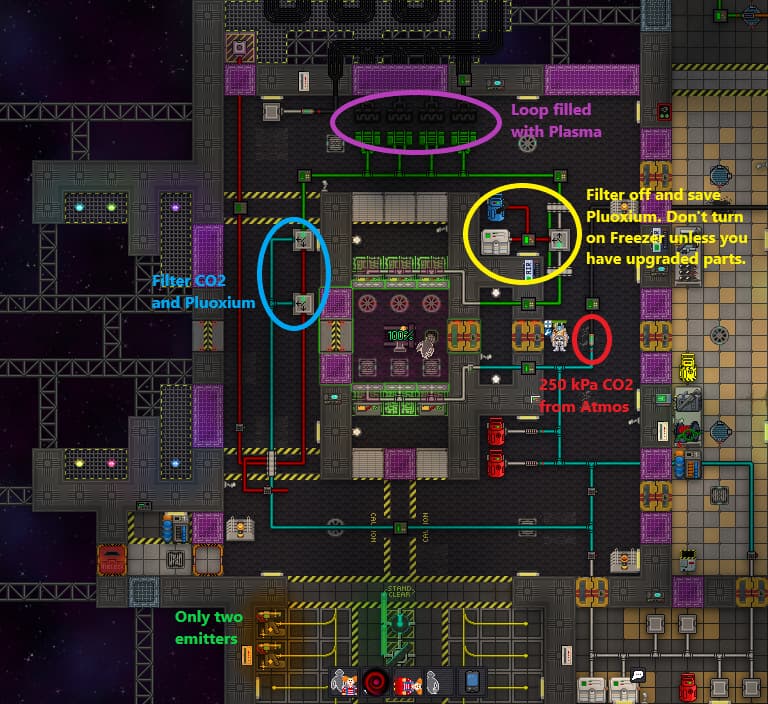
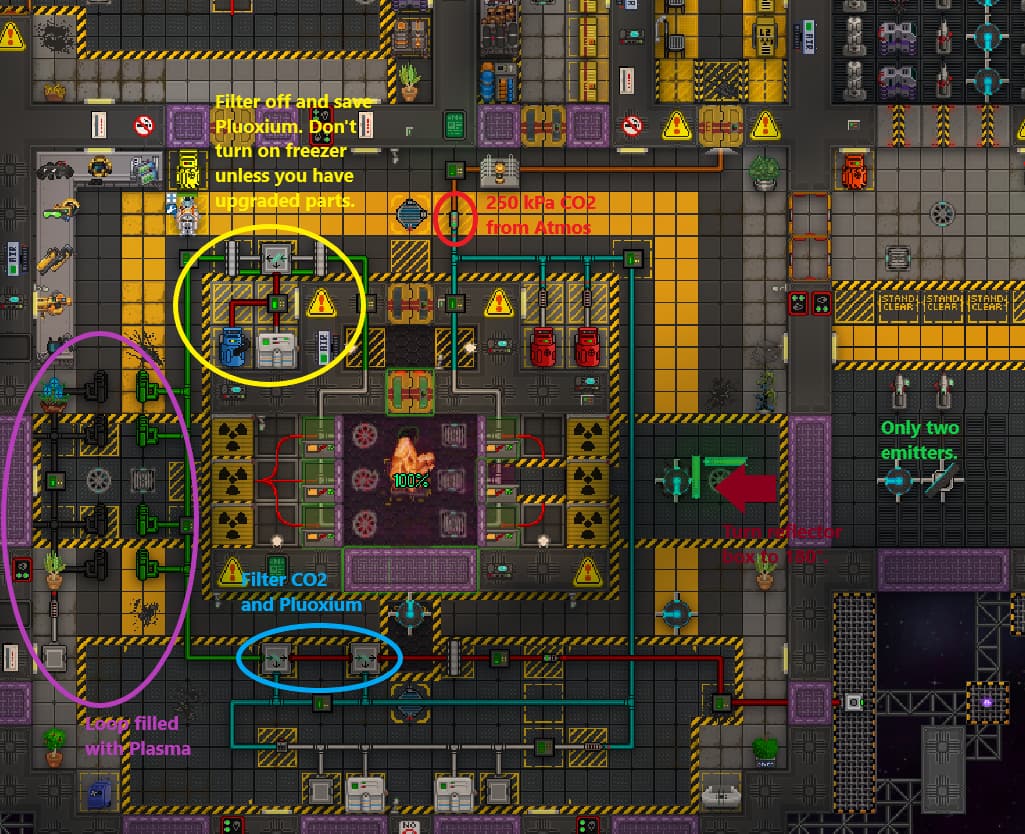
You’ll need to send CO2 from the output to the SM engine. In the end, you’ll need 250 kPa, but I like to send a bit extra to make sure that you always have enough. Then you’ll need to get a portable pump and fill it with Plasma. Use Volume Pumps to make sure that it has at least 9000 kPa in it.
Use the pump to completely fill 6 Plasma tanks for the Radiation Collectors. This way they’ll last for about 4 hours instead of only about half an hour. Then set the pump aside for filling up the cooling loop.
Next it’s time to set up the SM itself. This is more easily shown.
The cooling loop is completely disconnected from the main loop. Instead it’s filled with the rest of the Plasma from the Portable Pump and it uses Heat Exchangers to keep the main loop cool. In most cases this will involve doing a spacewalk to make some slight modifications to the loop. There are also four Heat Exchangers. I haven’t really played around with the number of these, but four is what I use. Feel free to play around with it a bit if you want.
The cooling loop is NOT multi-layered. This uses the default loop with only slight modifications to make sure that all the Heat Exchangers are connected and that there’s a connector for filling the loop with Plasma. You only need to make minor modifications.
The CO2 needs to be input on the input side of the SM (cyan pipes). This requires a little modification on MetaStation, KiloStation, and CorgStation but should be fine on the others.
Straight-pipe the main loop. If you’ve done anything with the SM before, you know why this is good. If not, I suggest reading a few of the guides on basic setups.
The extra layers of pipes at the first filter help cool the Pluoxium as it comes out of the SM. The second Pluoxium filter prevents any Pluoxium from being wasted. If the Pluoxium storage fills up, don’t worry; it’ll just build up extra in the SM and the power will lower. You should easily see this on the Smmonitor app when it happens. Just upgrade the Thermomachine and set it as low as possible or switch out the canister for an empty one. You could also set up some kind of external storage if you want.
Only two, unupgraded emitters! If you use more your EER will get too high. I haven’t tested it with emitters that have upgraded parts, but feel free to. Probably only do it one at a time, though. You technically don’t even need emitters to get power but your EER won’t be as high. This is helpful if your setup is done a little late and the emitters don’t have enough power to fire.
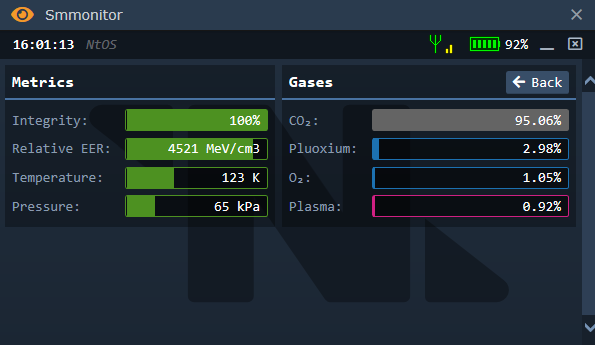
After all that, your Smmonitor should look something like this:
You’ll probably have to let it run for a couple minutes before it builds up to this.
I’ve managed to make a working and stable CO2-cooled supermatter by simply triple-layering the space loop, making sure the coolant loops are as straight-piped as possible, then starting the sm on N2 before starting to add co2 and then eventually remove the N2 from the coolant loops to make a pure co2-cooled supermatter.
I’ve seen this ghetto setup a lot recently and it’s just asking to be delammed. The cooling is especially atrocious given people only seem to dump the starter tank of plasma (each exchanger holding roughly 50mols) into the space loop. Have you ever had this monstrosity catch on fire?
Nope.
I’ve never had any issues with this. Also, because you’re saving a bunch of cold Pluoxium it’s actually pretty easy to turn off the CO2 and dump it in an emergency.
To make sure I’ve even spawned a Pyroclastic Anomaly in the SM chamber itself in a private server to simulate the worse possible scenario from a Supermatter Surge.
It stabilized itself with no input from me and lost maybe 5% of its integrity before completely fixing itself.
I really like your tutorial but I was trying to make sure that I got the EER to the highest, safe level that I could.
I also wanted to make sure that setting it up was as safe as possible. Once you make my setup, you just turn everything on and it never catches fire or needs any more input until the Pluoxium canister gets filled up. And that can easily be handled by just upgrading the Thermomachine’s parts or swapping in an empty canister. That won’t happen until about two hours after startup.
Just bumping this for anyone following it:
I added a setup for KiloStation.
I haven’t been playing much for the last couple weeks so I haven’t gotten around to this for a bit.
I don’t think anything much has changed for the other stations, but I’ll check them out and update if needed.
I wasn’t really planning to but all you have to do is add an extra emitter and the EER will go over 5000 and will start causing anomalies to spawn.
Then just turn it back off when you’re done getting a few cores.
So I’'ve played with the new pipe options and have found a rather overly engineered way to increase space cooling.
Basically, make the area of pipes running alongside the space cooler triple layered. Set plasma filters on each layer and all extra pipes change to the temp transfer pump. Set to 100%. Bonus points for taking one of the spare pipes and extending it to supply SM chamber cooling loops.
You can also add 3 more scrubbers on layer 2 to the SM chamber and have them meet the original 3 by the door to the SM chamber. The pipes will cover the original 3 scrubbers but can be placed as they don’t cross the original pipe direction. Means you can use layers 1 and 3 for the SM chamber cooling loop.
You can also triple up the gas filters for 3 layers of N and 3 layers of co2 filtering.
This takes much longer to setup though and station can run out of power before you finish. Also, because the cooling is so efficient, you can’t “kick start” the SM by throwing a pen at it. It stabilises too quickly to produce enough power to get the emitters going.
Once adding co2 I have gotten the SM producing over 1mw while staying under 50 kelvin. At that point, if you stop the scrubbers the SM will delam in a minute and produce a Singlo.
That’s true, but I’d only do that if you’re planning on keeping it above 5000 for a while.
I usually just turn it on until I get one or two anomaly to spawn and then I turn it off. I also will carry an Atmos water backpack to seal a Pyro anomaly in resin if it spawns.
It’s a little risky, but is fine if you only run it for one or two anomalies.
I completely removed the TEG from the CorgStation setup, but you don’t have to. Just don’t send gases to it.
This guide assumes that you only care about a CO2 SM setup.
Make a burn chamber if you want to run the TEG anyway.
Instead of filtering pluoxium out of the loop before it reaches the space loop then filtering it back in because you added a bypass you could flip the filter that filters it back in and make it output into a canister, reducing the amount of pluoxium present in the chamber since it doesn’t get thrown back in.