Hello! Today we’ll learn how to make our first contribution to the game!
This guide will start at the very beginning of contributing!
Github
First you need a github account.
You can make one in https://github.com
Now we need to create our own “fork” of Beecode, which will we use to stage our changes and make “Pull Requests”!
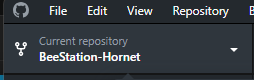
Here is a link to the Beestation “repository”: GitHub - BeeStation/BeeStation-Hornet: 99.95% station. 0.05% bees
Here we will press “Fork”

I personally can’t do this because I already have this Fork! But give it a name and everything and press create fork:

Now… going to my profile…


Good! The Fork is made!
Next Step: Github Desktop
Now, Download Github Desktop!
Hey! That download and install was fast!
Now, lets set it up!
Now, we will clone a repository:

You’ll be greeted by a list, your Fork will be here for the choosing!

Small Disclaimer, it’s been a while since I’ve had to set up Github Desktop, it may be possible that instead of cloning your Repository you need to clone Beestation’s manually trough URL. I don’t remember exactly. But do it this way and tell me if anything’s amiss!
Now, Cloning takes… a while, yeah… but soon it will be done!
Now… we need only to create a “branch”. We make a branch whenever we want to make any new changes. We’ll be making an item on a new branch. If we then decide to make another item, unless it is part of this Pull Request we make a new branch for it.
If I’m making a PR adding a new kitchen knife I will not on the same branch delete and rework IDs.
Here we go… we click here…

And here…

We want to base it on “master”. Its the “Game as it is” sort of". Our changes until they are “Merged” are entirely fictional.
The name you choose will mostly only be used by you so name it something you can remember!
Now we get to coding!
Now We’re Coding!
Now that we are after some coding socks we need Visual Studio Code: https://code.visualstudio.com
This is where we’ll make our code (and it comes bundled with the socks).
Now that everything’s set up we choose this:

You’ll now see this! But don’t get scared!

We first need to get some Expansion Packs to get all the coding DLC ![]()
Go here and choose extensions:

Now this is the list I have installed. I don’t remember exactly which ones you MUST have and which ones are optional for me.


In truth I also don’t exactly remember if anything here requires any particular set up.
I also know at some point you need to direct VSCode to your Beestation files. These are usually in Documents - Github - Name of Your Repo - Beestation.dme
Now, lets say we want to add a new knife that doesn’t hurt as much!
Coding the Item
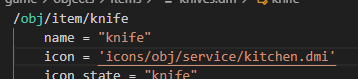
Being that we’re making an altered knife copy we first need to find the knife.
We can use SEARCH to pinpoint what we want to using any specific bit of information about what we’re looking for:

In this case, I know item names are always inside brackets. We’ll get some hits that don’t matter to us but you can see inside the Knives.dm file something has name = “knife” this means its name is knife believe it or not.
If we click it:

It brings us to it:

Now, first life hack is, this is a comment:
![]()
If its green and after // its a comment, this is not read by code at all. But, more importantly comments sometimes are WRONG. This one… isn’t exactly.
The only difference between this knife and the chefs knife is name and description. Why? I don’t know! But this could just as well be the chefs knife! Since this isn’t false we won’t remove this, but removing outdated comments and commenting on our own code is very good coding practice!
(Extra points if you find the chefs knife!)
Now, I’m going to do something in the worst possible way to get to explain why its bad.
Lets copy ALL of this.

And place it in the end of the file.

Now, firstly, we need a new “typepath”, this is a typepath:
![]()
This means that “knife” is a child of “item” that is a child of “obj”.
Children will inherit everything about their parrents so, knives will behave like an Item. And an obj. Knives won’t behave like… Areas or Airlocks.
Now, since we want a new knife we want it to behave like a knife! So, lets change the typepath!
We’re calling it the cheap knife why not!
![]()
Now, anything we do in /obj/item/knife/cheap will only affect /cheap, it wont affect the parent!
Also! Design direction! A cheap knife that isn’t as good as the original knife! Now we know exactly what we want to do!
Everything you see here is called a variable:

Unless we change them they remain the same as their parents.
You’ll notice Knife’s name variable is “knife” but its parent is “item”, because we gave that var a new value in /knife !
We can remove any vars we don’t expect to change, since they will remain as in /cheap 's parent.

You’ll notice I removed a LOT! If it won’t be changed it makes no sense to re-state it!
Now, to explain the variables!
name - the name of the item.
icon_state - what sprite from the “icon” file we’re using
desc - the description of the item
force - the damage it deals when attacking
throwforce - the damage it deals when throwing
bleed_force - how much it makes the target bleed
custom_price - the item’s price used in vendors!
Ok so lets get to editing!

Hey but what about bleed_force?
Yep, you’re right, this needs some further explanation. This uses what’s called a “Define”.
Defines are these things in blue that are used to make future changes to many items that may be using the same values much easier.
Right click that define!

Now press “Go to defenition”

Hey, here we are.
You can see, we can change the bleeding rate of ALL weapons from here, instead of changing them manually. This is why defines are important!
For now, lets pick a weaker bleed, like BLEED_SURFACE

We changed it and left a (sort of) helpful comment for future coders!
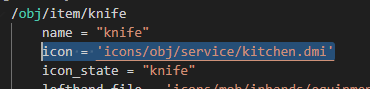
Now… the icon_state!
Go back to the parent! The mother of all knives at the top of the file!
You see icon… is a link? Odd right, lets control click it!

Here we have all sprites located in this icon file.
We can choose from these… but I don’t see what I want here! Lets keep looking!
Further down our original knives file we have this!

That’s another knives icon file! Why are they separated? The answer, years of contributions by different people! It leads to some de-organization!
Lets look.

Hey… what do you know! This bone knife looks almost like a plastic knife! There may also be some unused sprites here but for now I’ll pick this (until we make our own sprite in another guide!)

The name refuses to appear…

But I clicked amplify and now its all good!
Lets put this in our little knife!

Beautiful!
But… it still doesn’t exist!
Putting the Item in the game
We may have created a new item, but we now need to place it in the game in a way players may find it!
One good way of doing this is adding it to a vendor!
Now, we need to find the vendor, and if you know the name of the vendor you can do what we did for knife… but… vendors have stupid names! I only remember “banquet something”

Well… what do you know?
We don’t even have to scroll down to find the perfect placement of our knife! Under “utensils”

Lets grab our typepath and put it here!

There we go! You can see by the green thinggy that I added something in that line!
Now… to test this!!
Testing!
First, second life hack! Look for “lowmemorymode”.


This is great for making us not wait 2 centuries to load the map!
Lets uncomment this and hey! I wanna play in Meta, so lets uncomment that as well!

With quick start the game will start automatically and we’ll spawn with debug equipment.
With Force Map we get to choose what map we’ll play in!
(If we do not force one but have lowmemorymode enabled then we’ll play in RuntimeStation, a debug station.)
Now, lets press F5, or alternatively:

And wait for the game to launch!
If we’ve made any errors they will appear here:

And the compiling process will stop. (Compiling is basically the code running with your changes to see if everything’s working.)

Hey we’re in! And we don’t need to do anything, the game will start on its own, because of quickstart, remember!

OH OH!!
Your first bug
What the fuck?!
This is why its important to ALWAYS TEST YOUR CHANGES!
This is not what we want the knife to look like!
What did we do wrong?!

We have the icon_state like we want it to… OHHHH!
See! We forgot something important!
What is the icon file we’re using?
Since we don’t define one we’re still using the same as the parent.
And in this file there no bone_dagger !!

So instead the game just gives us the first sprite, since it can’t find what we’re telling it to!
Lets fix this!
Hey! Look here! This uses the same sprite!

And this is the Icon file it gets its sprite from!

Yup, there it is! So we need only copy this over!

There we go, now… testing…
Hey! Awesome!

Everything looking good! Lets take some screenshots for our PR!!


Yep! Okay! That should be enough testing!
You’re now ready!
Your First PR!
You can save and close VSCode now! Lets go back to GithubDesktop!

(Remember to save!)
We can see everything we’ve changed here!

And now we need to commit these changes! But wait!!
We don’t want “quickmode” and our testing defines to be a part of our changes!

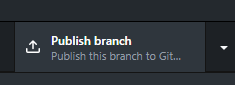
There we go… Now we publish!
Then commit! (Or the other way around!)

And then we PUSH these changes into our branch!

And now… the dreaded PR!

You can also delete your basemap.dm changes and a button will appear.


Lets go!

We’ll be greeted with this, you’ll see I took the liberty to name our PR accordingly!
A good title makes your PR easy to understand and maybe even stand out!
We want maintainers to have no issue with our PRs!

In the about section we explain what our PR does!

In this section we let maintainers know why we thing our change is good for the game, and maybe our thought process behind adding and coding it.

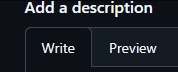
Here we put our images, this may look like nothing now but, we can use the preview mode to see them:

There they are!

Changelog is what will appear later in game!
Here we summarize our changes, if we put a name after the cl the game will use that to identify the author, else it will use our Github username!
We can give a last review of our changes before creating the PR by scrolling down:

And now we’re ready!

Press create!
And its done!

This will now always exist, even if I close it!
Now we take this link and spam it on pr-discussions so maints can see it

Before doing that we should wait at least until the checks finish:

If theres something even slightly wrong, these will fail and we’ll have to fix it!
(Sometimes they just fail on their own because they’re filthy dirty bastards)

Good! They passed! Its our of our hands now!
Now we wait for maintainers to merge, comment, or request any changes!
I hope this helped you! Good luck contributing and if you have any questions let me know!
Cheers!!

